
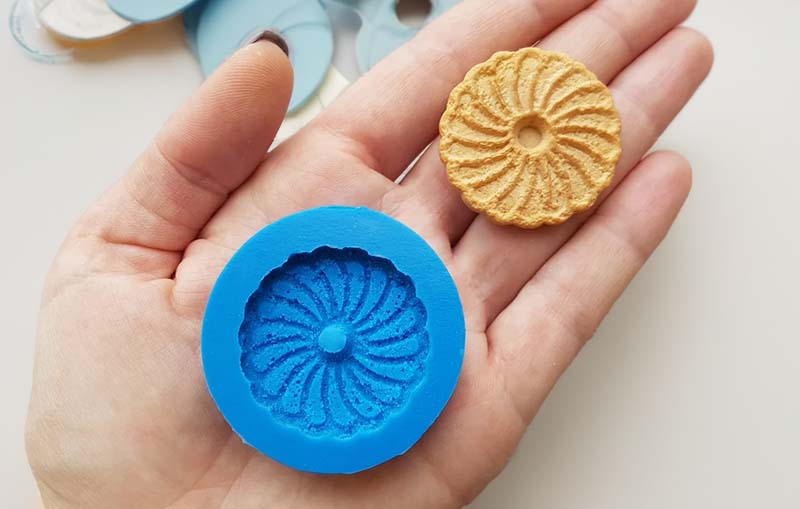
Make your own silicone mold and unlock a world of creative possibilities in your crafting projects.
Here we’ll guide you through three easy methods to create your own silicone molds. We’ll look at using 2-part liquid silicone, brush-on silicone, and silicone putty. Each method has its own advantages and is suited to different types of projects. Let’s dive into the world of silicone mold making and explore how you can bring your unique ideas to life!
Making Silicone Molds with 2-Part Liquid Silicone Rubber
Using 2-part liquid silicone rubber is a common and popular choice for making silicone molds. This is due to its versatility and the high-quality results it delivers.
This method involves using a two-component system where a silicone base is mixed with a catalyst (Hardener). This causes the mixture to cure and solidify around the object, capturing its details precisely.
Using liquid silicone rubber to make molds Is ideal for projects where accuracy and detail are crucial. For example if you’re making intricate resin jewellery or even large sculptural pieces.
Materials for Making a Mold
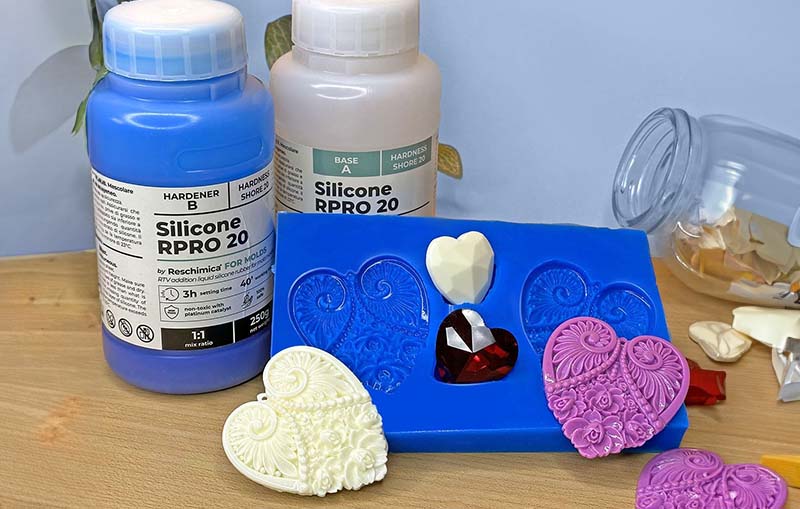
- 2-part liquid silicone: Available in various hardness levels to suit different project needs.
- Mixing container: A container with a flat bottom to mix the silicone and catalyst (Hardener).
- Stirring stick: To mix the silicone and catalyst (Hardener) thoroughly.
- Mold box or frame: To contain the silicone around the object during the curing process.
- Object to be molded: The item you wish to create a mold of.
- Scale: To measure the silicone and catalyst (Hardener) accurately (optional but recommended).
- Gloves: To protect your hands during the mixing and pouring process.
- Protective eyewear: To safeguard your eyes from splashes.
Steps for Making a 2-Part Silicone Rubber Mold
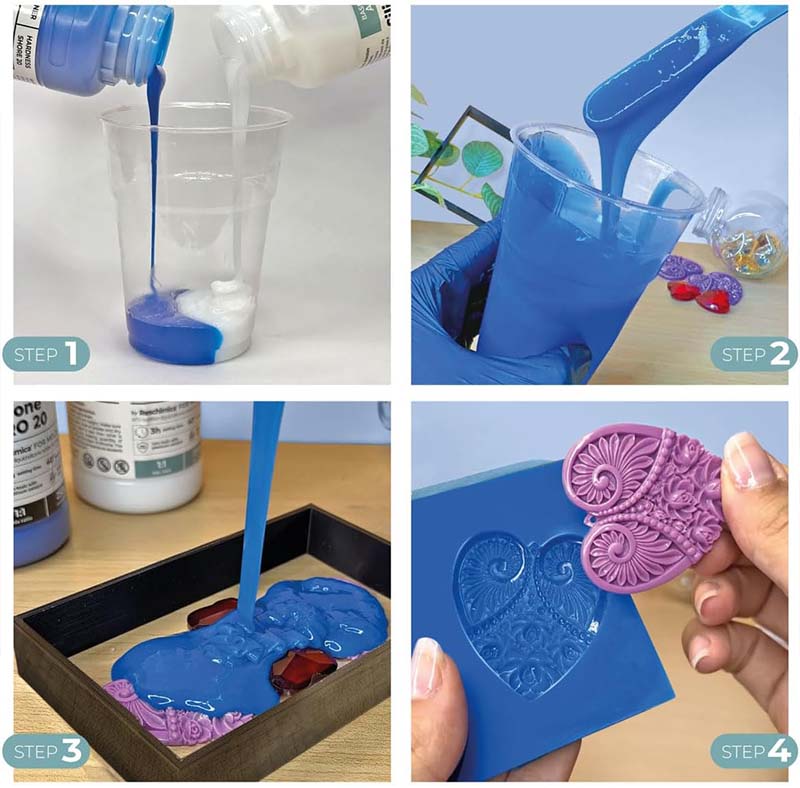
Preparing the Mold Box
- Choose or Construct a Mold Box: The mold box should be slightly larger than the object, allowing for a silicone border of at least 10mm (½ inch) around all sides.
- Seal the Box: Ensure there are no gaps where silicone could leak out. Use a non-permanent sealant if necessary.
- Position Your Object: Secure the object at the bottom of the box. It can be attached with a bit of clay or an adhesive that won’t interfere with the silicone curing.
Mixing the Silicone
- Measure Precisely: Follow the manufacturer’s instructions to measure out the silicone base and catalyst (Hardener). Accuracy is key to ensure proper curing.
- Mix Thoroughly: Combine the base and catalyst (Hardener) in your mixing container. Stir slowly and deliberately to minimize air bubbles, scraping the sides and bottom of the container.
Pouring the Silicone
- Pour Slowly: Begin pouring the silicone into the lowest corner of the mold box and let it rise over the object, reducing air bubbles.
- Eliminate Bubbles: If bubbles form, you can gently tap the sides of the mold box or use a vacuum chamber to help remove them.
Curing Time
- Wait Patiently: Curing time can vary based on the product and room temperature, typically ranging from 6 to 24 hours.
- Test the Mold: Gently touch the silicone’s surface to ensure it’s fully cured and doesn’t stick to your finger.
No products found.
2-Part Silicone Mold Making Tips
- Avoid Air Bubbles: Mix slowly and pour carefully to minimise air bubbles, which can affect the mold’s detail capture.
- Test Mix: If you’re unsure about the mixing ratio or curing, do a small test mix to check the curing process and result.
- Clean Your Object: Ensure the object to be molded is clean and dry to prevent imperfections in the mold.
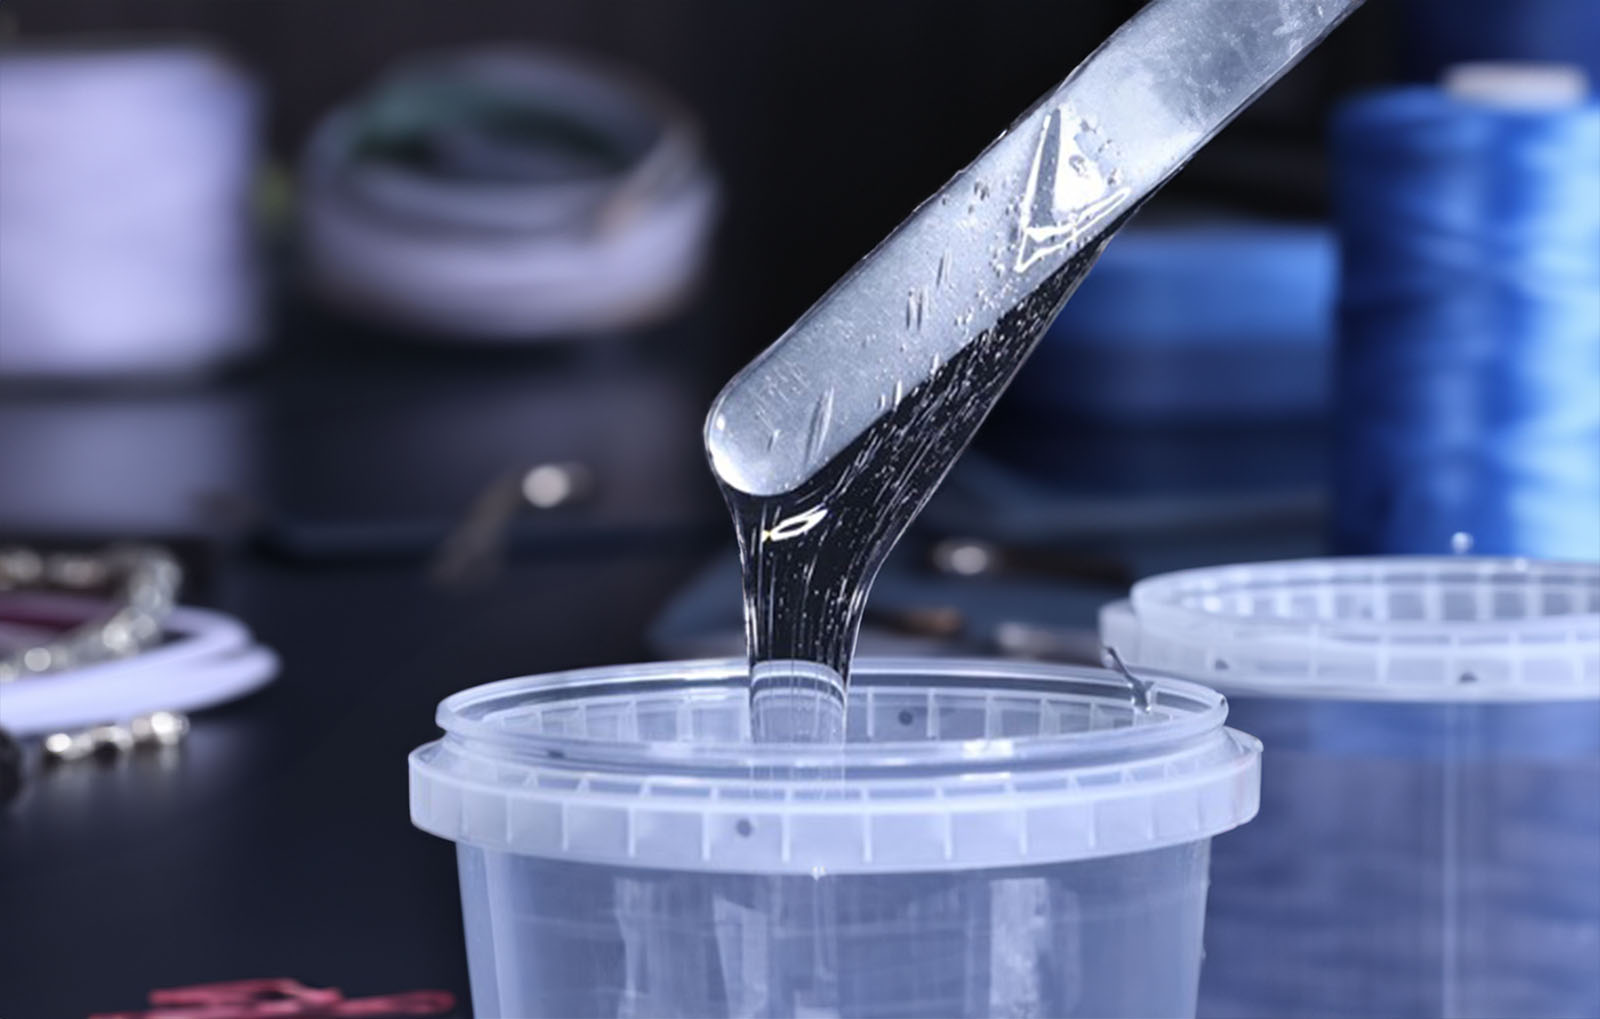
When it comes to silicone mould making, the choice of material can make all the difference in the world. One material that I love to use for making moulds is liquid silicone rubber.
How to Make a Silicone Brush on Mold
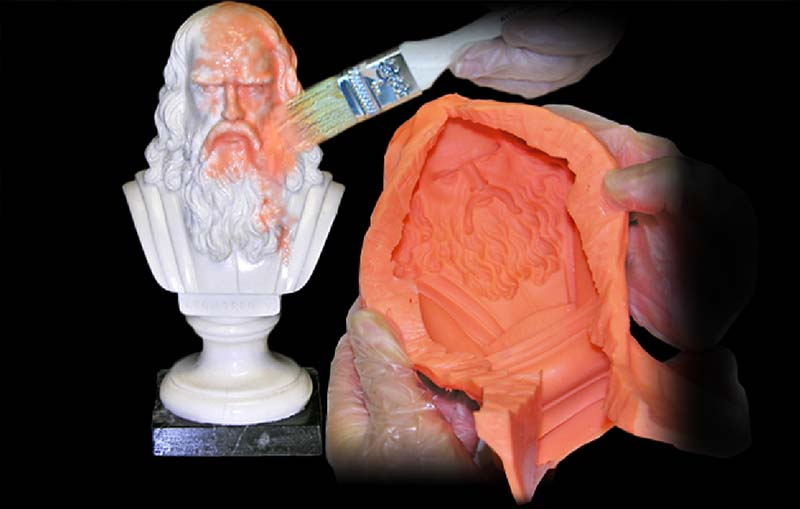
The Brush-On Silicone Method offers a precise approach to mold making. It is particularly suited for objects with intricate details or irregular shapes.
This method involves applying silicone rubber in layers, allowing you to capture fine details and undercuts that other methods might miss.
It’s especially useful for larger items or those with complex geometries, where a pourable silicone might not reach every nook and cranny without trapping air bubbles.
No products found.
Steps for Making a Brush-on Silicone Mold
- 1. Surface Preparation: Start by cleaning the object to be molded, ensuring it’s free of dust, oil, or any contaminants. Apply a mold release agent if the object’s material requires it. This step is crucial to ensure that your silicone mold separates cleanly from the object once cured.
- 2. Mixing the Silicone: Prepare your brush-on silicone rubber according to the manufacturer’s instructions. If your silicone is too runny, mix in a thixotropic agent to achieve a brushable consistency. Ensure the mixture is homogenous to avoid any weak spots in the mold.
- 3. Applying the First Layer: Using a brush, apply a thin, detailed coat of silicone over the entire surface of the object. This initial layer is critical as it captures the fine details. Avoid creating air bubbles; use a dabbing motion in intricate areas to ensure complete coverage.
- 4. Building Up Layers: Once the first layer has partially cured (check the product’s instructions for specific timings), apply subsequent layers to build up the mold’s thickness. Each layer should be slightly thicker than the last, providing strength to the mold. Allow each layer to cure to the touch before applying the next.
- 5. Creating a Support Shell (if necessary): For larger or more complex molds, you’ll need a support shell to maintain the mold’s shape. Once the silicone layers are fully cured, apply a support shell using materials like plaster bandages or a fiberglass jacket.
- 6. Curing and Demolding: After applying the final layer and allowing it to cure completely, gently remove the support shell (if used) and carefully peel away the silicone mold from the object. Take your time to avoid tearing the mold, especially if the object has intricate details or undercuts.
Brush-on Silicone Mold Tips
- Detail Orientation: The first layer of silicone is crucial for capturing detail. Ensure it’s as thin and detailed as possible.
- Layer Consistency: Make sure each layer is partially cured before applying the next. This prevents layers from blending together, which could compromise the mold’s detail and integrity.
- Tool Variety: Use different brush sizes to access all areas of the object, ensuring even coverage and detail capture.
- Patience is Key: Rushing the process can lead to imperfections. Allow adequate time for each layer to cure, ensuring the mold’s durability and fidelity to the original design.
How to Make a Putty Mold
The Silicone Putty Method is a favourite because of its simplicity and speed. By simply mixing the two component materials together you get a flexible, yet durable mold. Silicone putty is ideal for smaller projects or items with intricate details.
This method is particularly useful when you need to create a mold quickly or when working with children or beginners. Silicone putty requires less preparation and has a more forgiving learning curve.
No products found.
What do You Need to Make a Putty Mold?
- Silicone molding putty (available in two parts, usually labeled Part A and Part B)
- Your object to be molded
- A clean, flat surface to work on
- Protective gloves (optional but recommended)
Steps for Making a Silicone Putty Mold
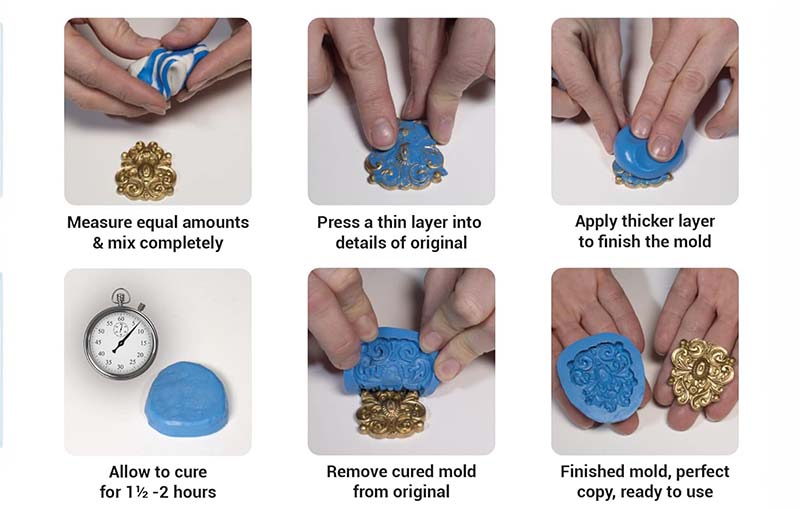
1. Mixing the Putty
Begin by kneading equal parts of Part A and Part B together until you achieve a uniform color with no streaks. This indicates that the putty is thoroughly mixed. Work quickly, as the putty begins to cure within minutes once mixed.
2. Application
Immediately after mixing, press the putty around your object. Ensure that you’re pressing firmly to capture all the details and avoid trapping air bubbles. If you’re making a one-sided mold, press the object halfway into the putty. For a two-sided mold, completely encase your object, making sure the putty is even and smooth.
3. Curing
Silicone putty has a rapid curing time, typically setting within 15-25 minutes. Refer to your product’s instructions for the exact time as some will vary. Once cured, the silicone will transform from pliable to firm yet flexible.
4. Demolding
Gently remove your object from the cured putty. If done correctly, you should have a detailed and accurate reproduction of your object’s shape and texture.
Tips for Making a Putty Mold
- Work Quickly: Since silicone putty cures fast, have all your materials prepared and a clear idea of your mold-making process before you begin mixing.
- Avoid Air Bubbles: Press the putty firmly against the object to eliminate air pockets, which can cause imperfections in your mold.
- Consistent Thickness: Ensure the putty is evenly distributed around your object. Uneven thickness can lead to weak spots in the mold.
- Practice: If it’s your first time using silicone putty, consider practicing with a less important object to get a feel for the material’s behavior and curing time.
Make Your Own Silicone Mold – FAQs
How do you dispose of leftover silicone material?
To dispose of leftover silicone material, you should let it cure fully and then dispose of it as solid waste. Avoid pouring uncured silicone down the drain, as it can harden and cause blockages.
What safety measures should you take when working with silicone?
To make your own silicone mold, wear protective gear like gloves and work in a well-ventilated area to avoid inhaling fumes. If silicone comes into contact with your skin or eyes, wash it off immediately with plenty of water.
Can these silicone molds be used for food purposes?
Not all silicone molds are food-safe. To ensure a mold is safe for food use, it must be made from food-grade silicone. If you’re making a mold at home, ensure the silicone material you’re using is certified for food contact, and follow any additional manufacturer’s guidelines for food safety.


